> ## Documentation Index
> Fetch the complete documentation index at: https://docs.derivadex.com/llms.txt
> Use this file to discover all available pages before exploring further.
# Your First Trade on DerivaDEX
> Connect your wallet, deposit collateral, and place your first trades on DerivaDEX.
## What We'll Build Together
In this tutorial, we'll complete your first trades on DerivaDEX:
1. Connect MetaMask to the testnet
2. Get testnet tokens and deposit 1,000 USDC as collateral
3. Enable one-click trading
4. Place a limit sell order
5. Execute a market buy order
6. View your open position
We'll use the [DerivaDEX testnet](https://testnet.derivadex.io) so you can practice without real funds.
Once you're comfortable with the process, we'll show you how to transition to mainnet for real trading.
***
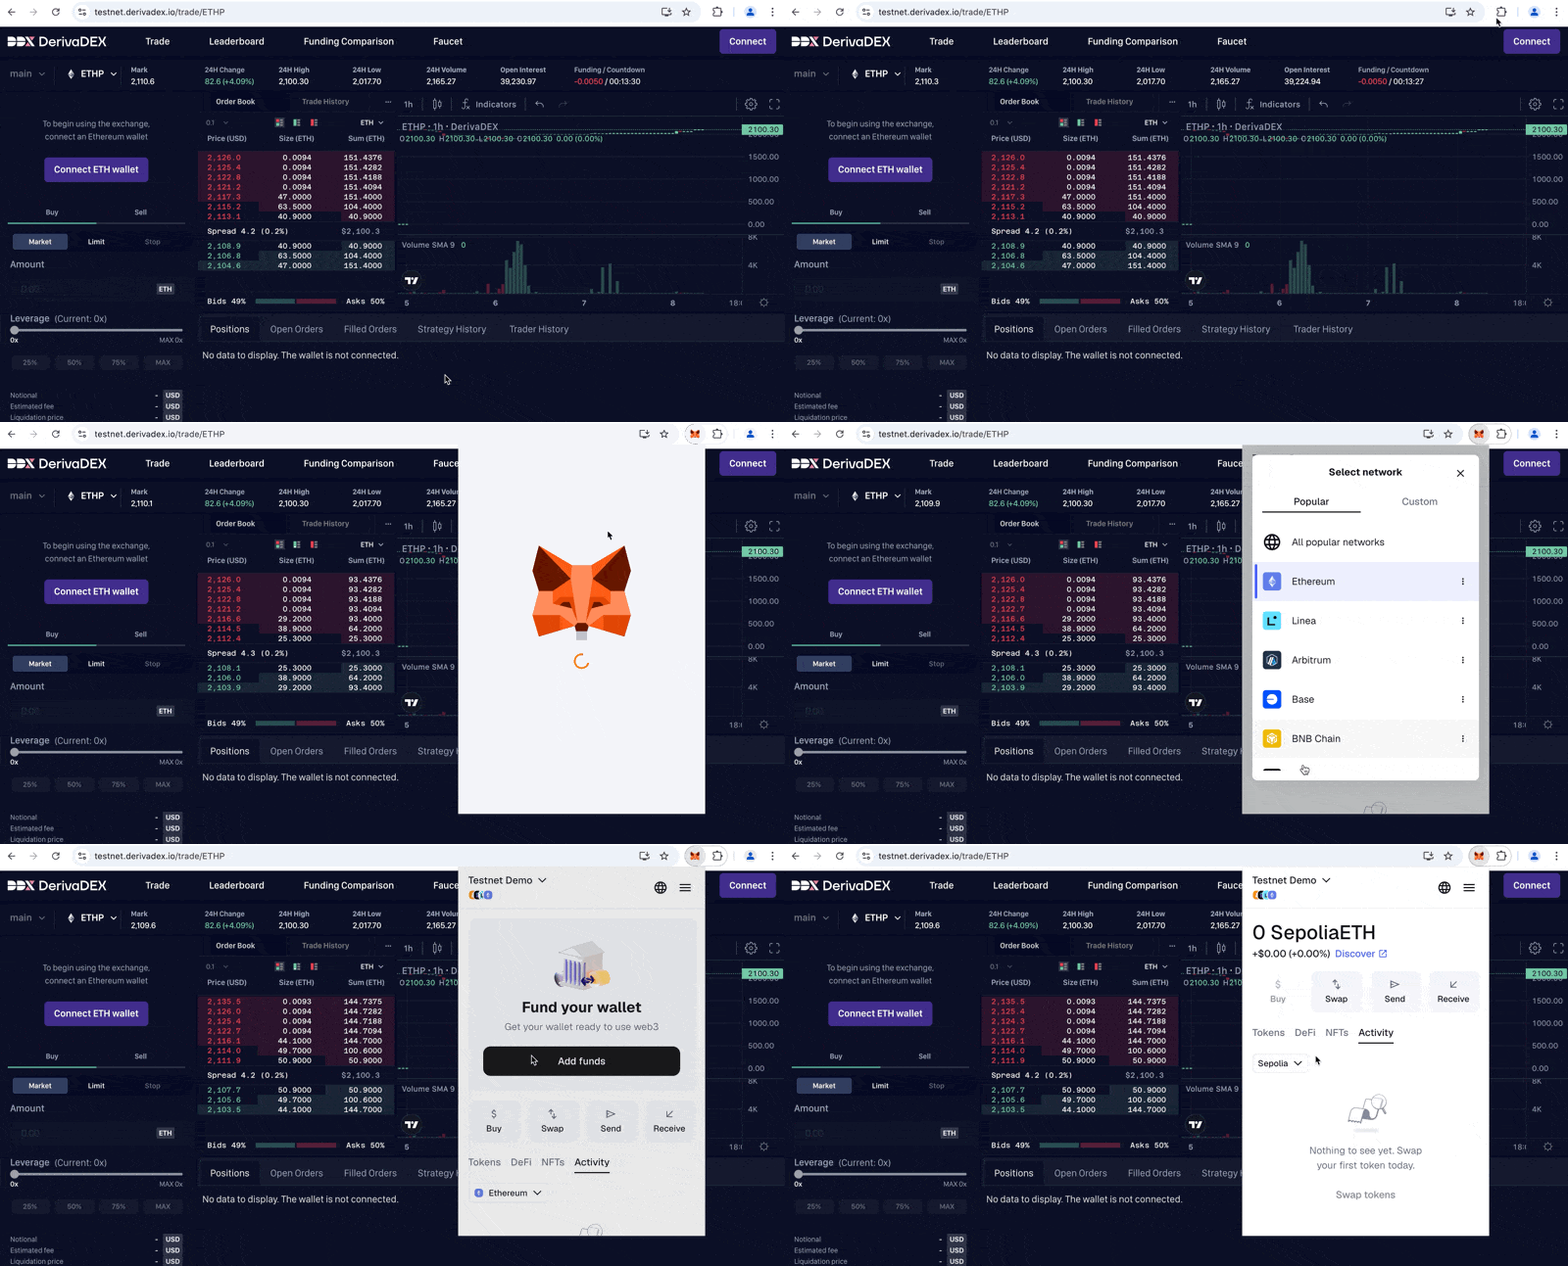
## Step 1: Set Up Your Wallet and Network
1. Install the [MetaMask Chrome extension](https://metamask.io/) if you don't have it
2. Open MetaMask and click the network dropdown underneath the Tokens tab
3. Select **Sepolia** test network (if you don't see Sepolia in your network list, you may need to enable test networks in MetaMask settings)
 ## Step 2: Get Sepolia ETH for Gas Fees
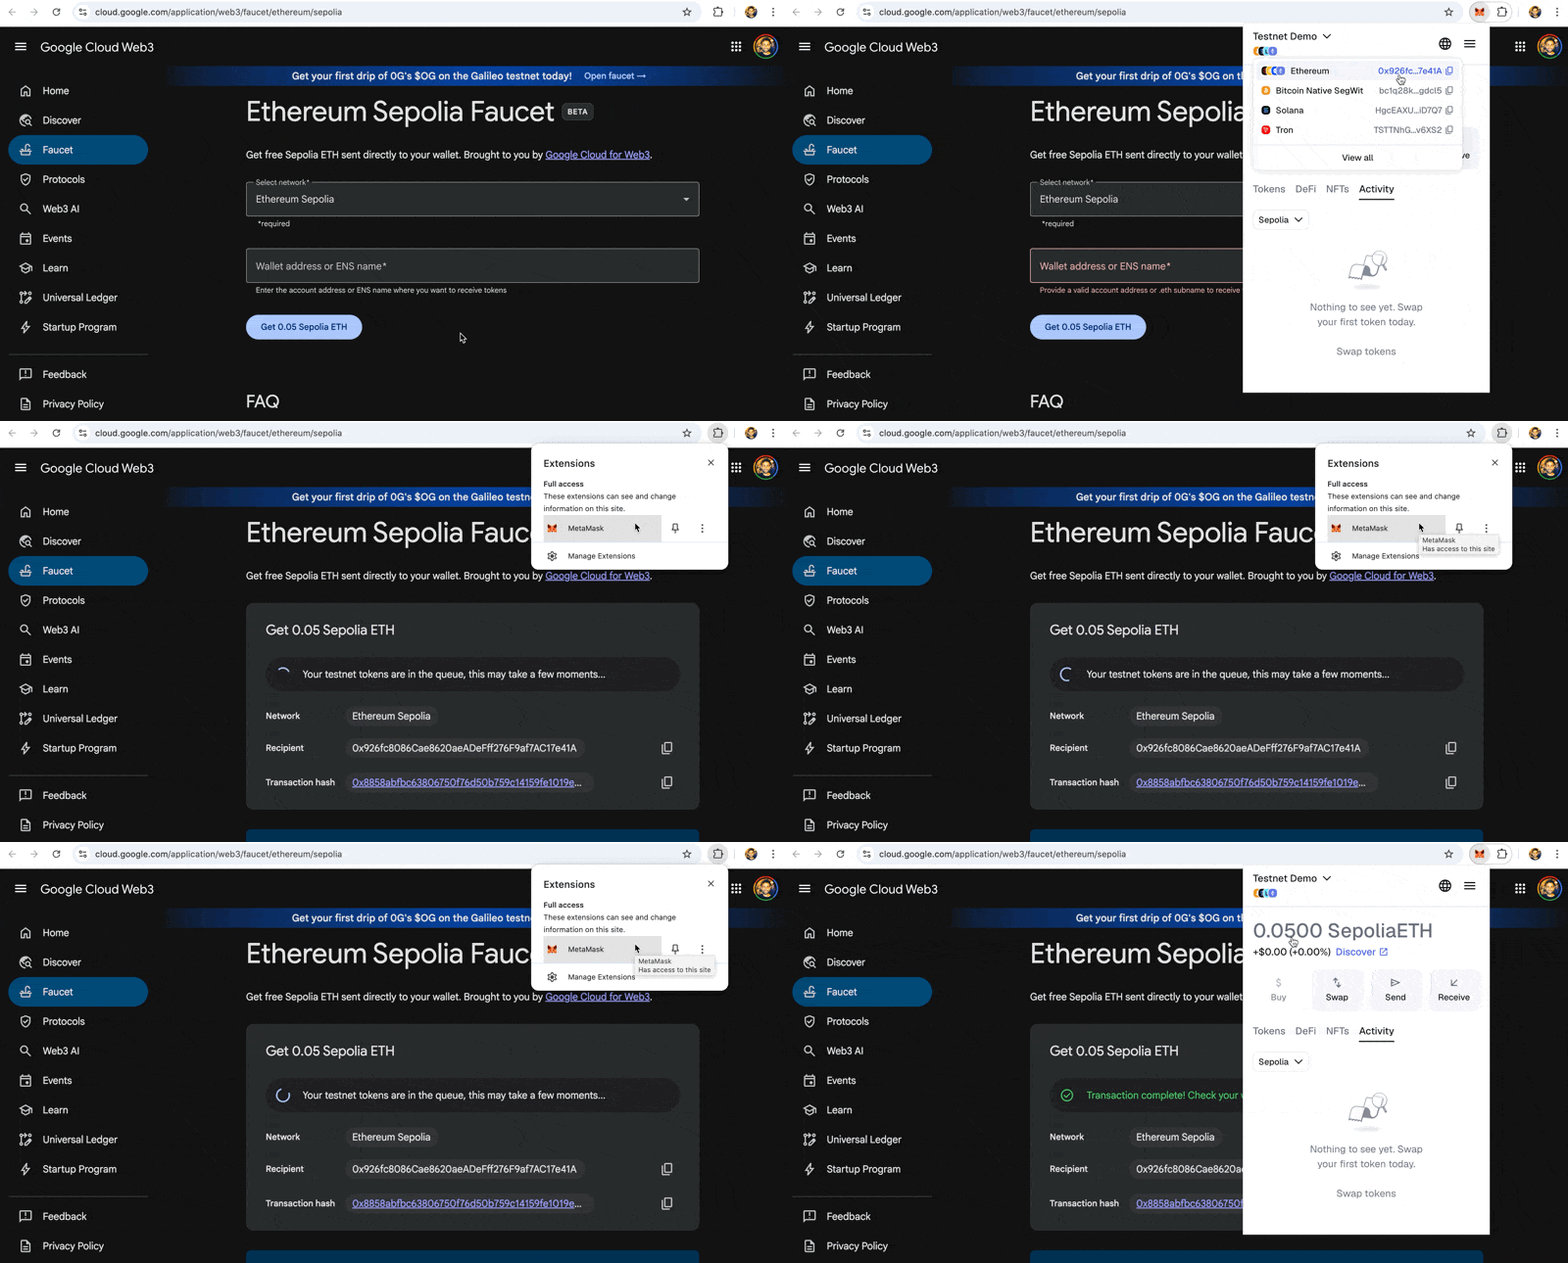
You need Sepolia ETH to pay for deposit and withdrawal transactions (trading itself is gasless).
1. Go to the [Google Cloud Sepolia faucet](https://cloud.google.com/application/web3/faucet/ethereum/sepolia)
2. Enter your wallet address
3. Click **Receive 0.05 Sepolia ETH**
After a few moments, you'll see the ETH appear in your MetaMask wallet.
## Step 2: Get Sepolia ETH for Gas Fees
You need Sepolia ETH to pay for deposit and withdrawal transactions (trading itself is gasless).
1. Go to the [Google Cloud Sepolia faucet](https://cloud.google.com/application/web3/faucet/ethereum/sepolia)
2. Enter your wallet address
3. Click **Receive 0.05 Sepolia ETH**
After a few moments, you'll see the ETH appear in your MetaMask wallet.
 ## Step 3: Connect Your Wallet to DerivaDEX
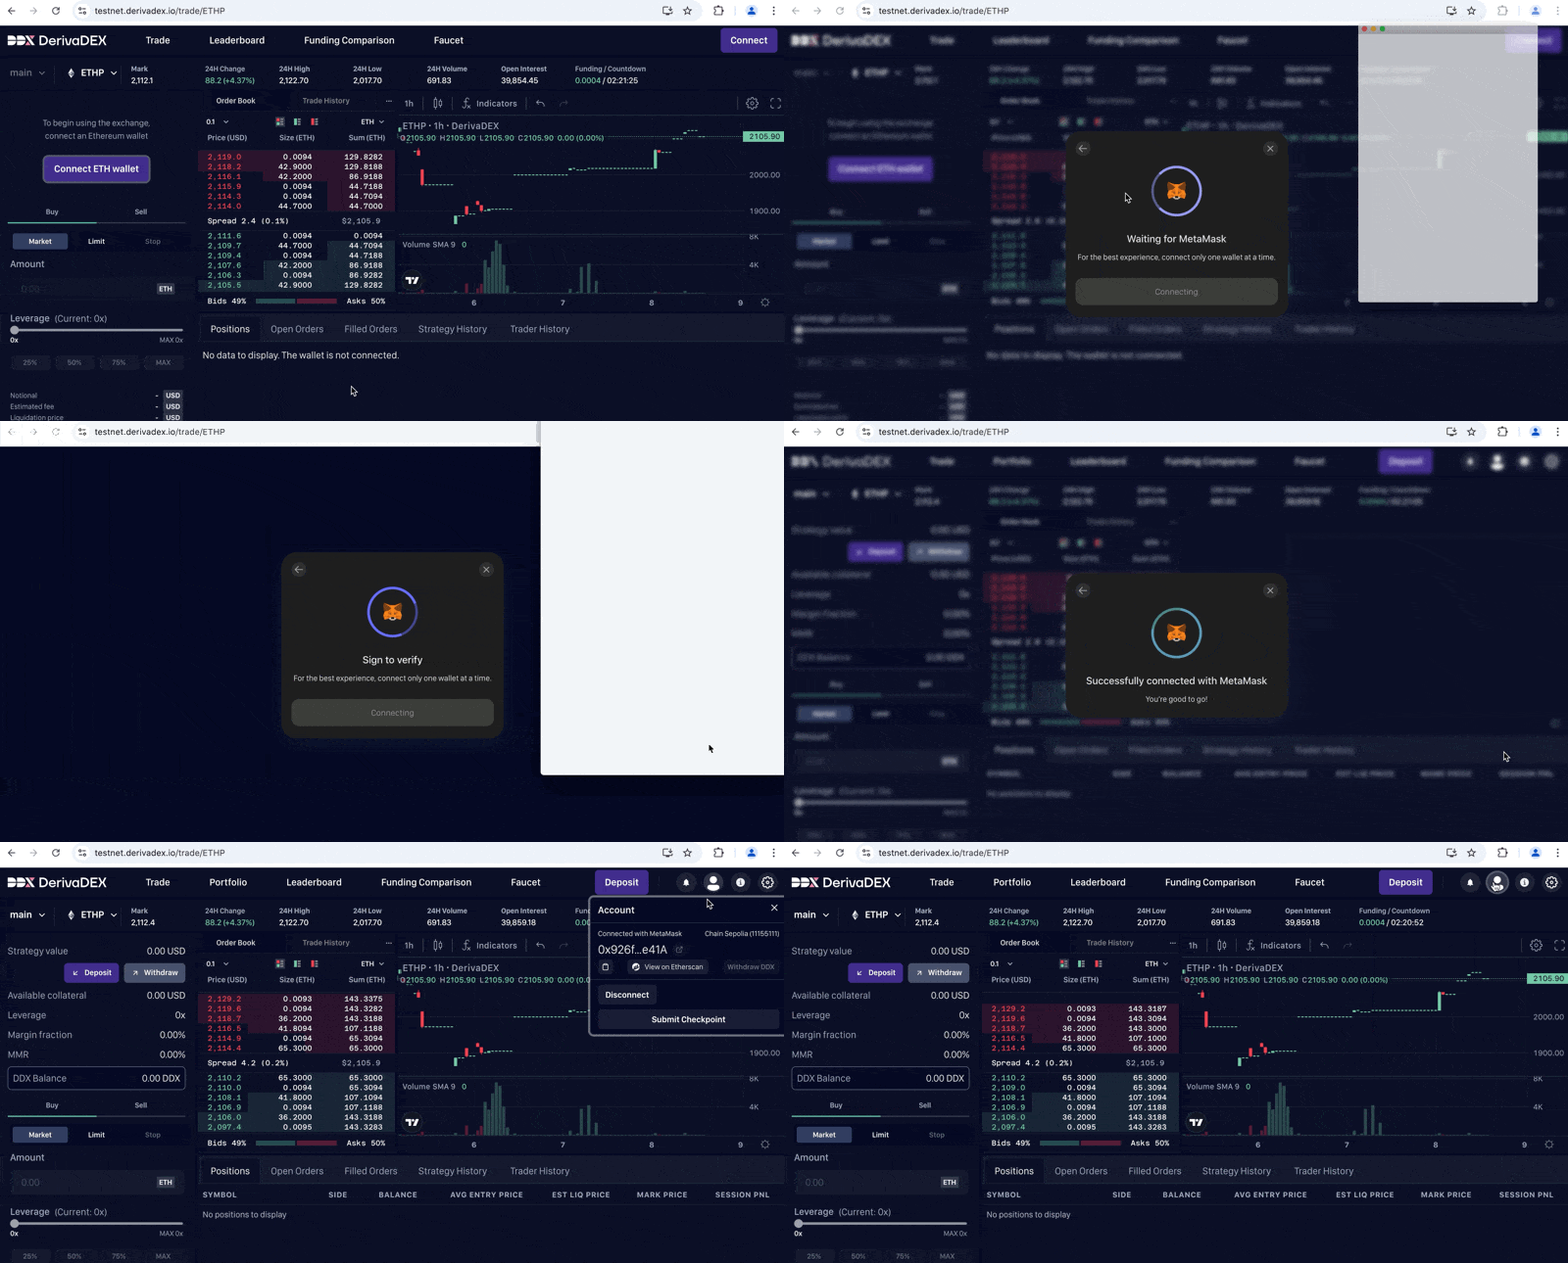
1. Go to [DerivaDEX testnet](https://testnet.derivadex.io) in your browser
2. Click **Connect ETH wallet** on the left sidebar
3. Click **MetaMask**
4. Select your account in the MetaMask popup and click **Connect**
5. Click **Confirm** to approve the signature request from Privy
After these steps, you'll see a success message: **"Successfully connected with MetaMask"**.
To double-check your connection, click the person icon in the top-right corner and confirm the address is what you expect.
Your wallet is now connected to the testnet.
## Step 3: Connect Your Wallet to DerivaDEX
1. Go to [DerivaDEX testnet](https://testnet.derivadex.io) in your browser
2. Click **Connect ETH wallet** on the left sidebar
3. Click **MetaMask**
4. Select your account in the MetaMask popup and click **Connect**
5. Click **Confirm** to approve the signature request from Privy
After these steps, you'll see a success message: **"Successfully connected with MetaMask"**.
To double-check your connection, click the person icon in the top-right corner and confirm the address is what you expect.
Your wallet is now connected to the testnet.
 ***
## Step 4: Reach the Trading Screen
Testnet may present an eligibility or verification gate before trading actions are enabled.
1. If the page offers a testnet bypass action such as **"Skip account verification"**, use it.
2. Continue only when the trade screen shows the **Deposit** and **Withdraw** controls and the faucet route is available.
3. If the page still blocks trading after refresh, stop and use the official DerivaDEX support channel rather than guessing a hidden route.
***
## Step 5: Get Testnet USDC
Now we need testnet USDC to use as trading collateral.
1. Click **"Faucet"** in the top navigation bar
2. Click **"Mint 10,000 Testnet USDC"**
You'll see a confirmation toast: **"Minted 10000 USDC for \[your wallet address]"**
3. Click **"Trade"** in the top navigation to return to the main exchange interface
You now have 10,000 testnet USDC ready for depositing.
> **Note:** If you see a "Rate Limited" warning, you've already minted within the last 24 hours. You can continue with whatever USDC you have.
***
## Step 6: Deposit Collateral
Now we'll deposit 1,000 USDC as trading collateral.
1. Click the purple **"Deposit"** button on the left sidebar
2. In the deposit form, set:
* **Strategy**: "main" (leave as default)
* **Collateral Type**: "USDC"
* **Amount**: `1000`
Notice at the bottom it shows **"Available: 10,000 USDC"** — your wallet balance from the previous step.
3. Click **"Deposit"** to submit the transaction.
***
## Step 4: Reach the Trading Screen
Testnet may present an eligibility or verification gate before trading actions are enabled.
1. If the page offers a testnet bypass action such as **"Skip account verification"**, use it.
2. Continue only when the trade screen shows the **Deposit** and **Withdraw** controls and the faucet route is available.
3. If the page still blocks trading after refresh, stop and use the official DerivaDEX support channel rather than guessing a hidden route.
***
## Step 5: Get Testnet USDC
Now we need testnet USDC to use as trading collateral.
1. Click **"Faucet"** in the top navigation bar
2. Click **"Mint 10,000 Testnet USDC"**
You'll see a confirmation toast: **"Minted 10000 USDC for \[your wallet address]"**
3. Click **"Trade"** in the top navigation to return to the main exchange interface
You now have 10,000 testnet USDC ready for depositing.
> **Note:** If you see a "Rate Limited" warning, you've already minted within the last 24 hours. You can continue with whatever USDC you have.
***
## Step 6: Deposit Collateral
Now we'll deposit 1,000 USDC as trading collateral.
1. Click the purple **"Deposit"** button on the left sidebar
2. In the deposit form, set:
* **Strategy**: "main" (leave as default)
* **Collateral Type**: "USDC"
* **Amount**: `1000`
Notice at the bottom it shows **"Available: 10,000 USDC"** — your wallet balance from the previous step.
3. Click **"Deposit"** to submit the transaction.
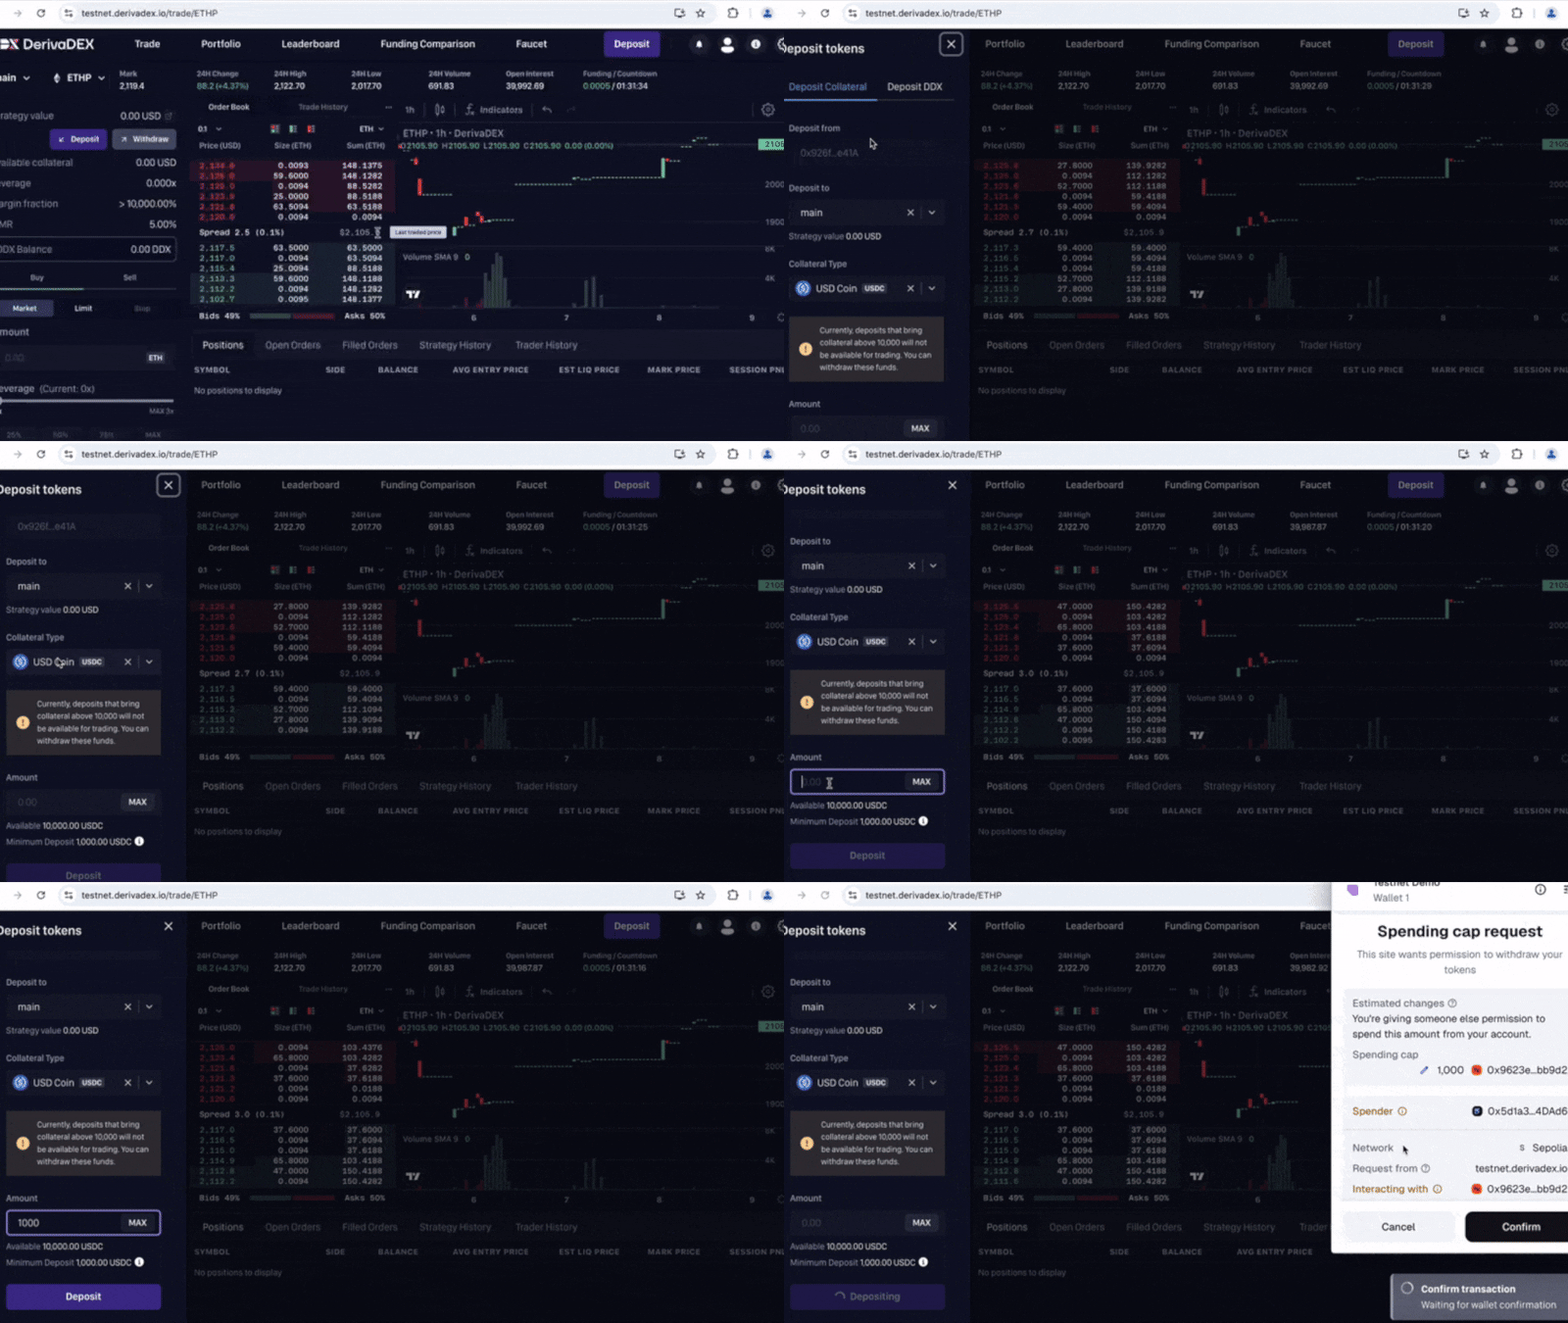 4. Click confirm/approve both MetaMask popups:
* **Approval** — grants permission to move USDC
* **Deposit** — transfers the USDC
A moment later, you'll see a success message: **"Transaction successful, waiting for confirmation"** with a transaction hash link.
4. Click confirm/approve both MetaMask popups:
* **Approval** — grants permission to move USDC
* **Deposit** — transfers the USDC
A moment later, you'll see a success message: **"Transaction successful, waiting for confirmation"** with a transaction hash link.
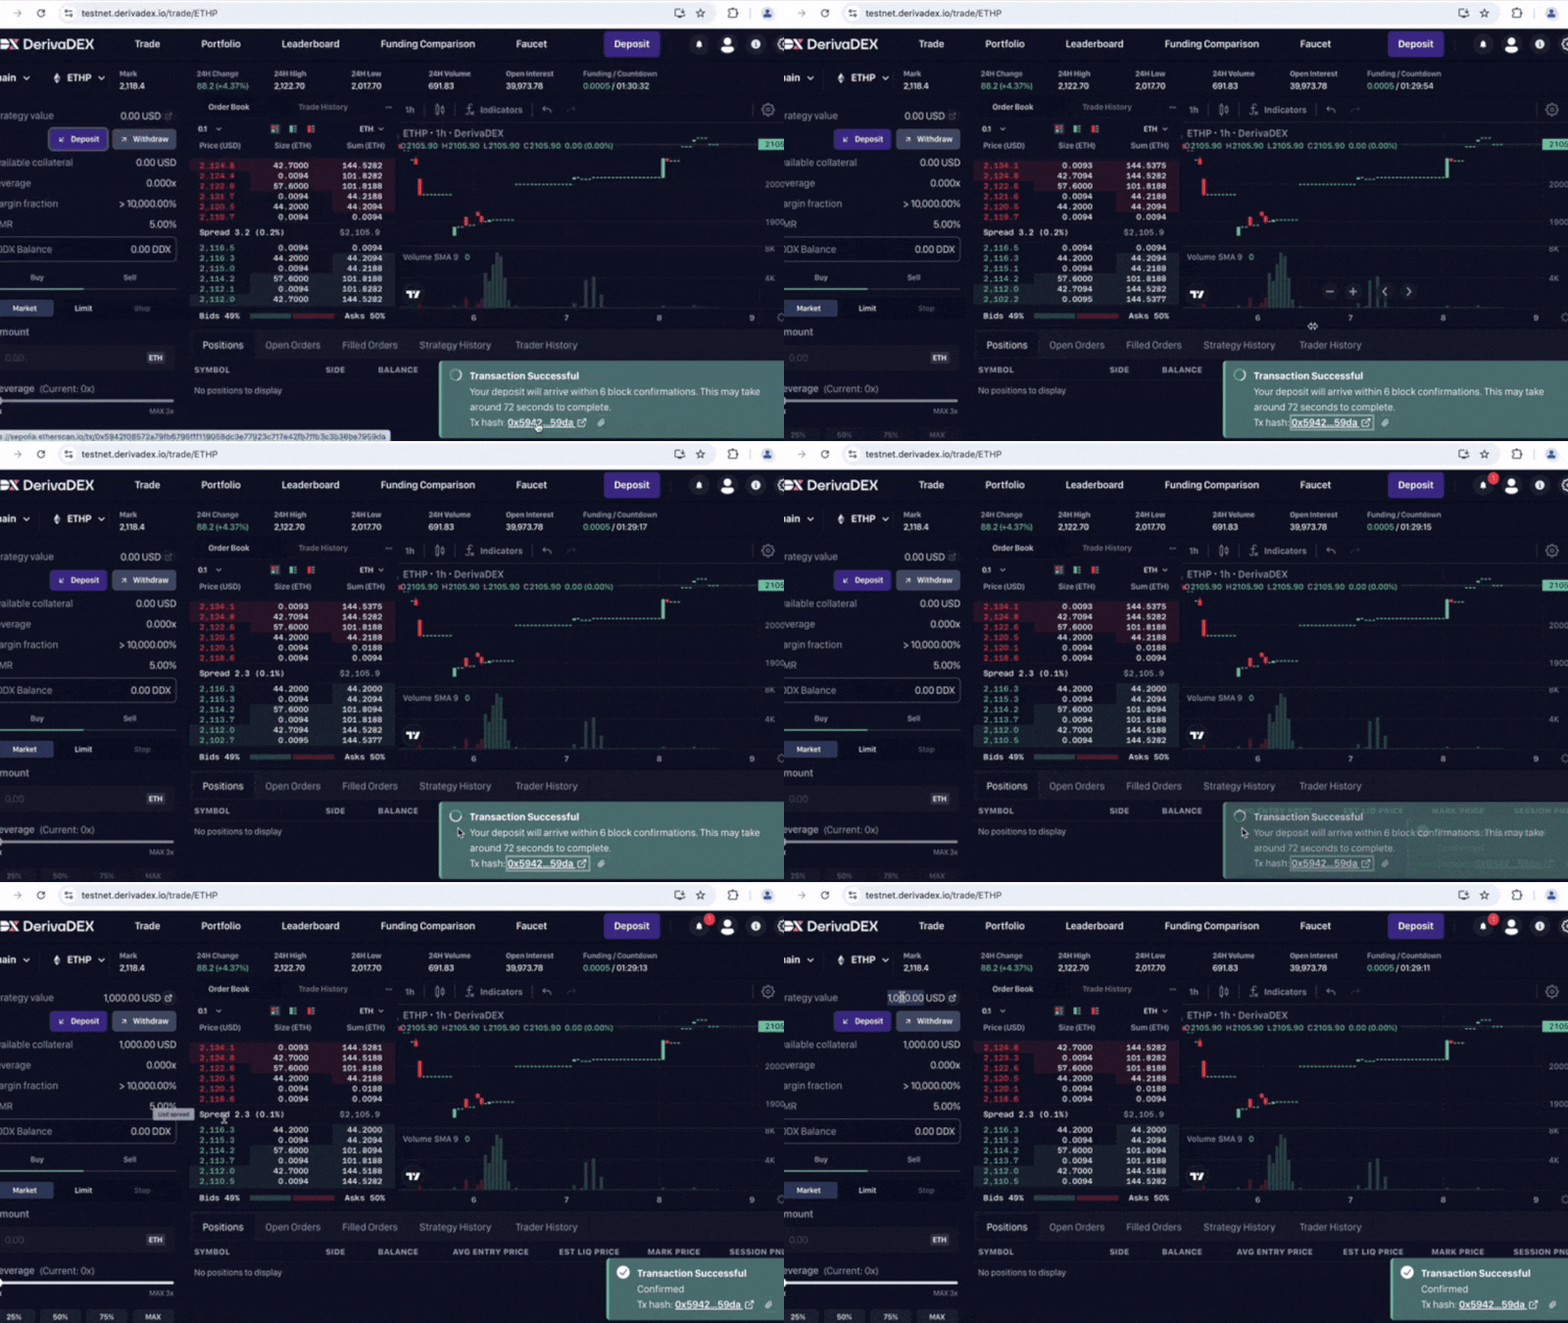
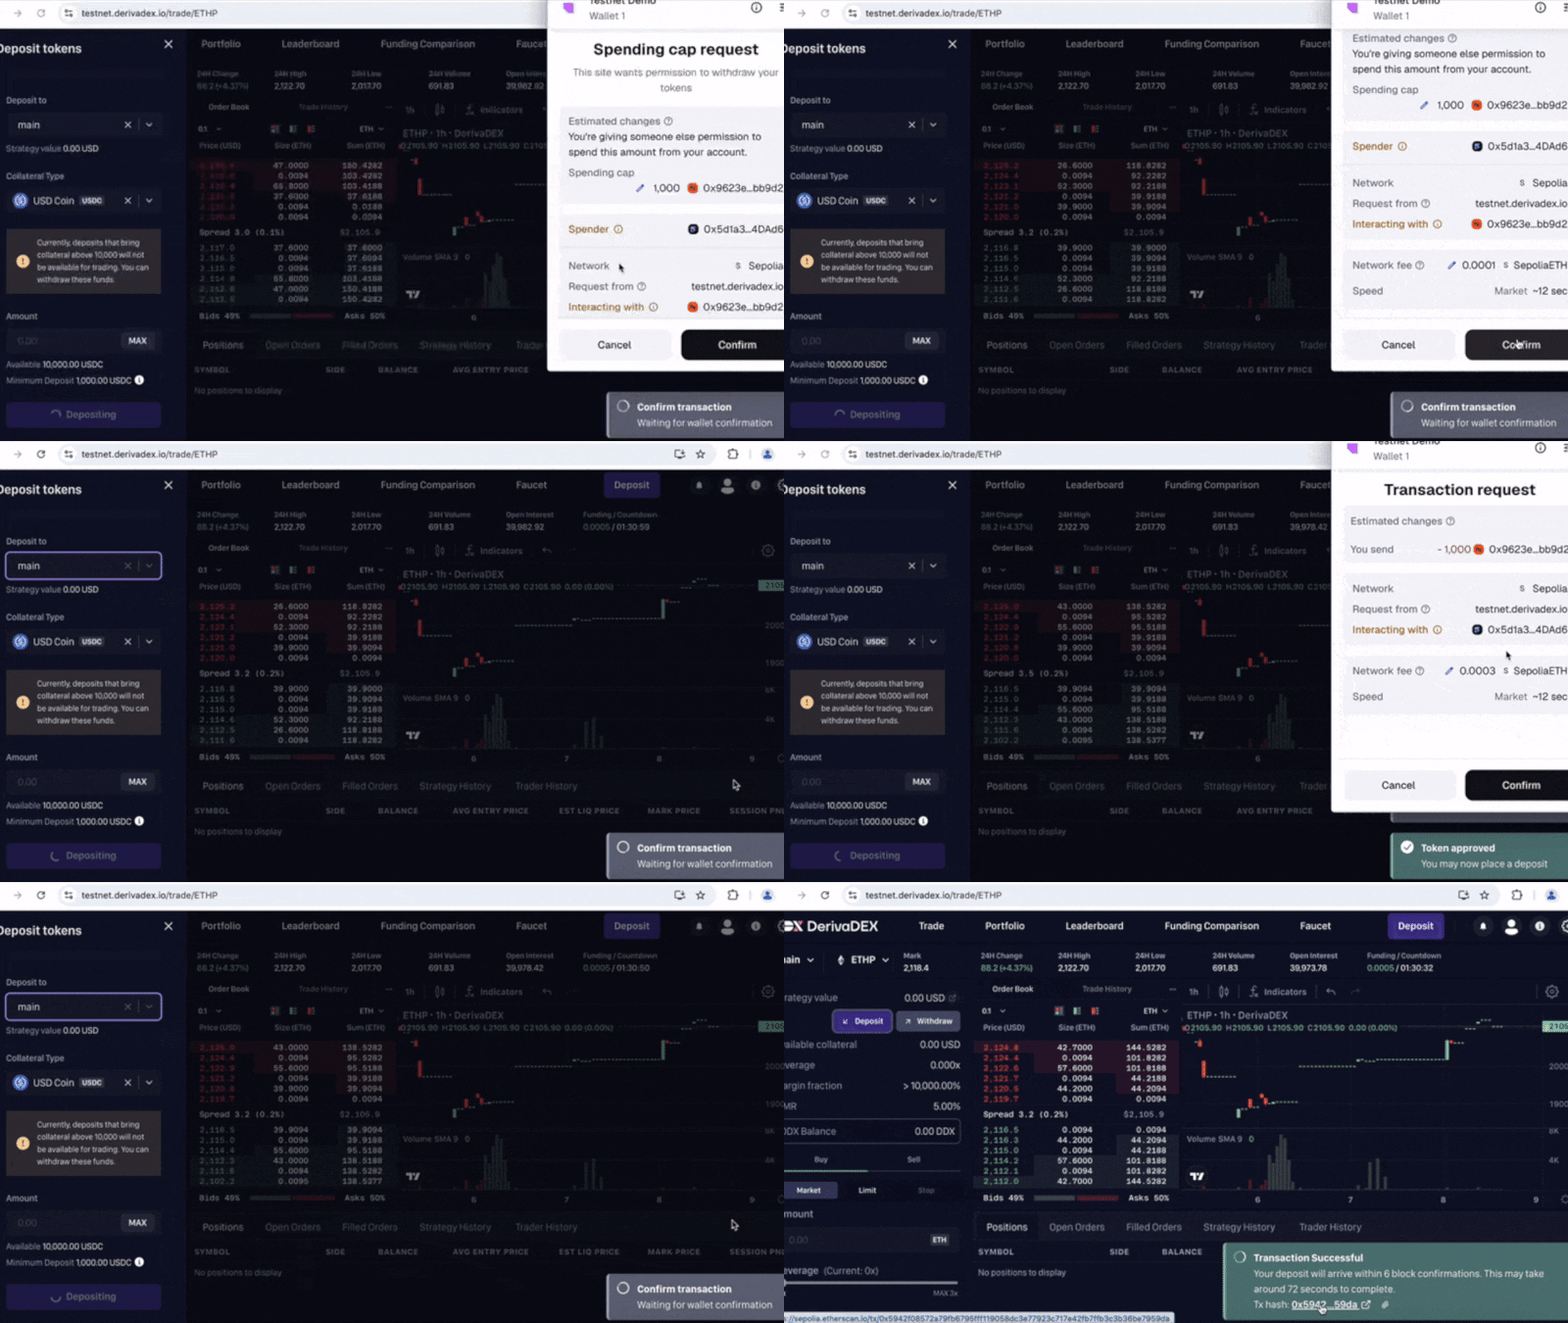 After about **14 block confirmations**, you'll see a final success message: **"Transaction successful, confirmed"**.
Your strategy balance will update to show **Strategy Value: 1,000 USD**.
After about **14 block confirmations**, you'll see a final success message: **"Transaction successful, confirmed"**.
Your strategy balance will update to show **Strategy Value: 1,000 USD**.
 ***
## Step 7: Enable One-Click Trading
One-click trading reduces the number of wallet signatures required when placing trades.
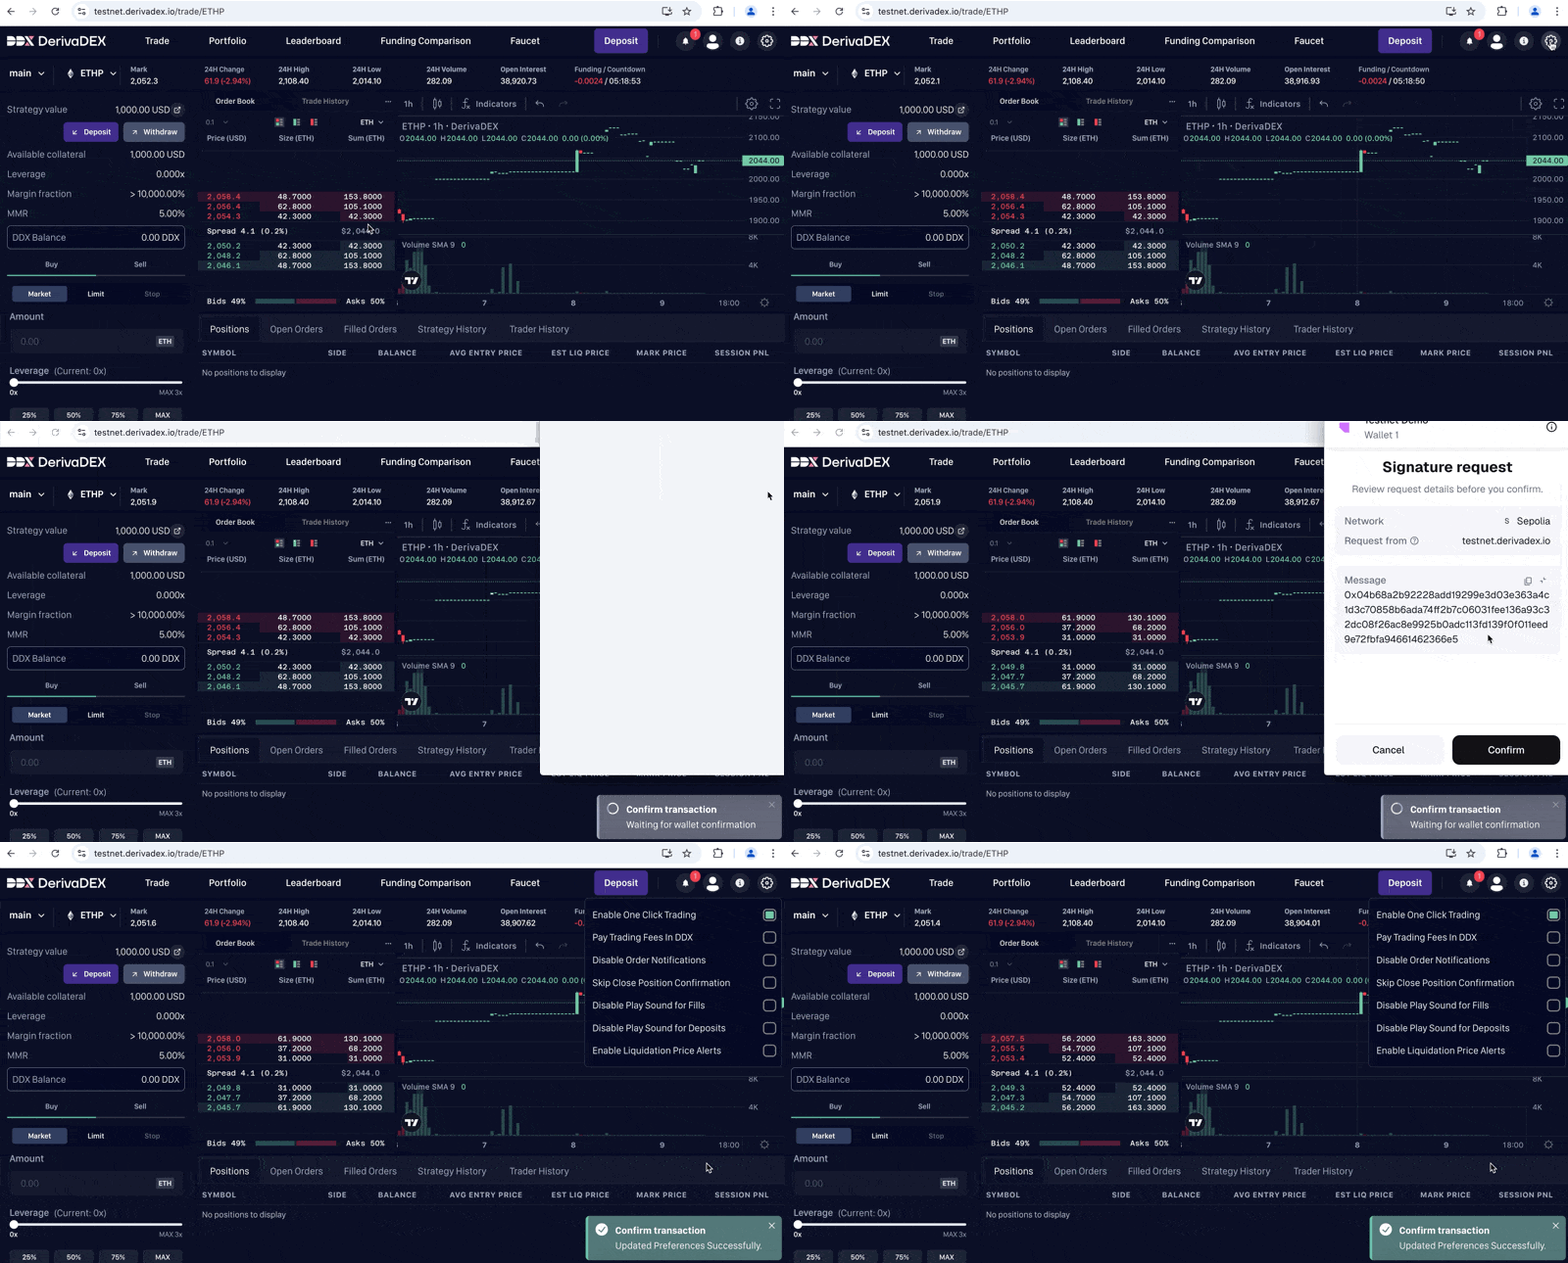
1. Click the **gear icon** in the top-right corner
2. Toggle on **"One-click trading"**
3. Click **"Confirm"** in the MetaMask popup
You'll see: **"Confirm transaction updated preferences successfully"**
***
## Step 7: Enable One-Click Trading
One-click trading reduces the number of wallet signatures required when placing trades.
1. Click the **gear icon** in the top-right corner
2. Toggle on **"One-click trading"**
3. Click **"Confirm"** in the MetaMask popup
You'll see: **"Confirm transaction updated preferences successfully"**
 ***
## Step 8: Place a Limit Sell Order
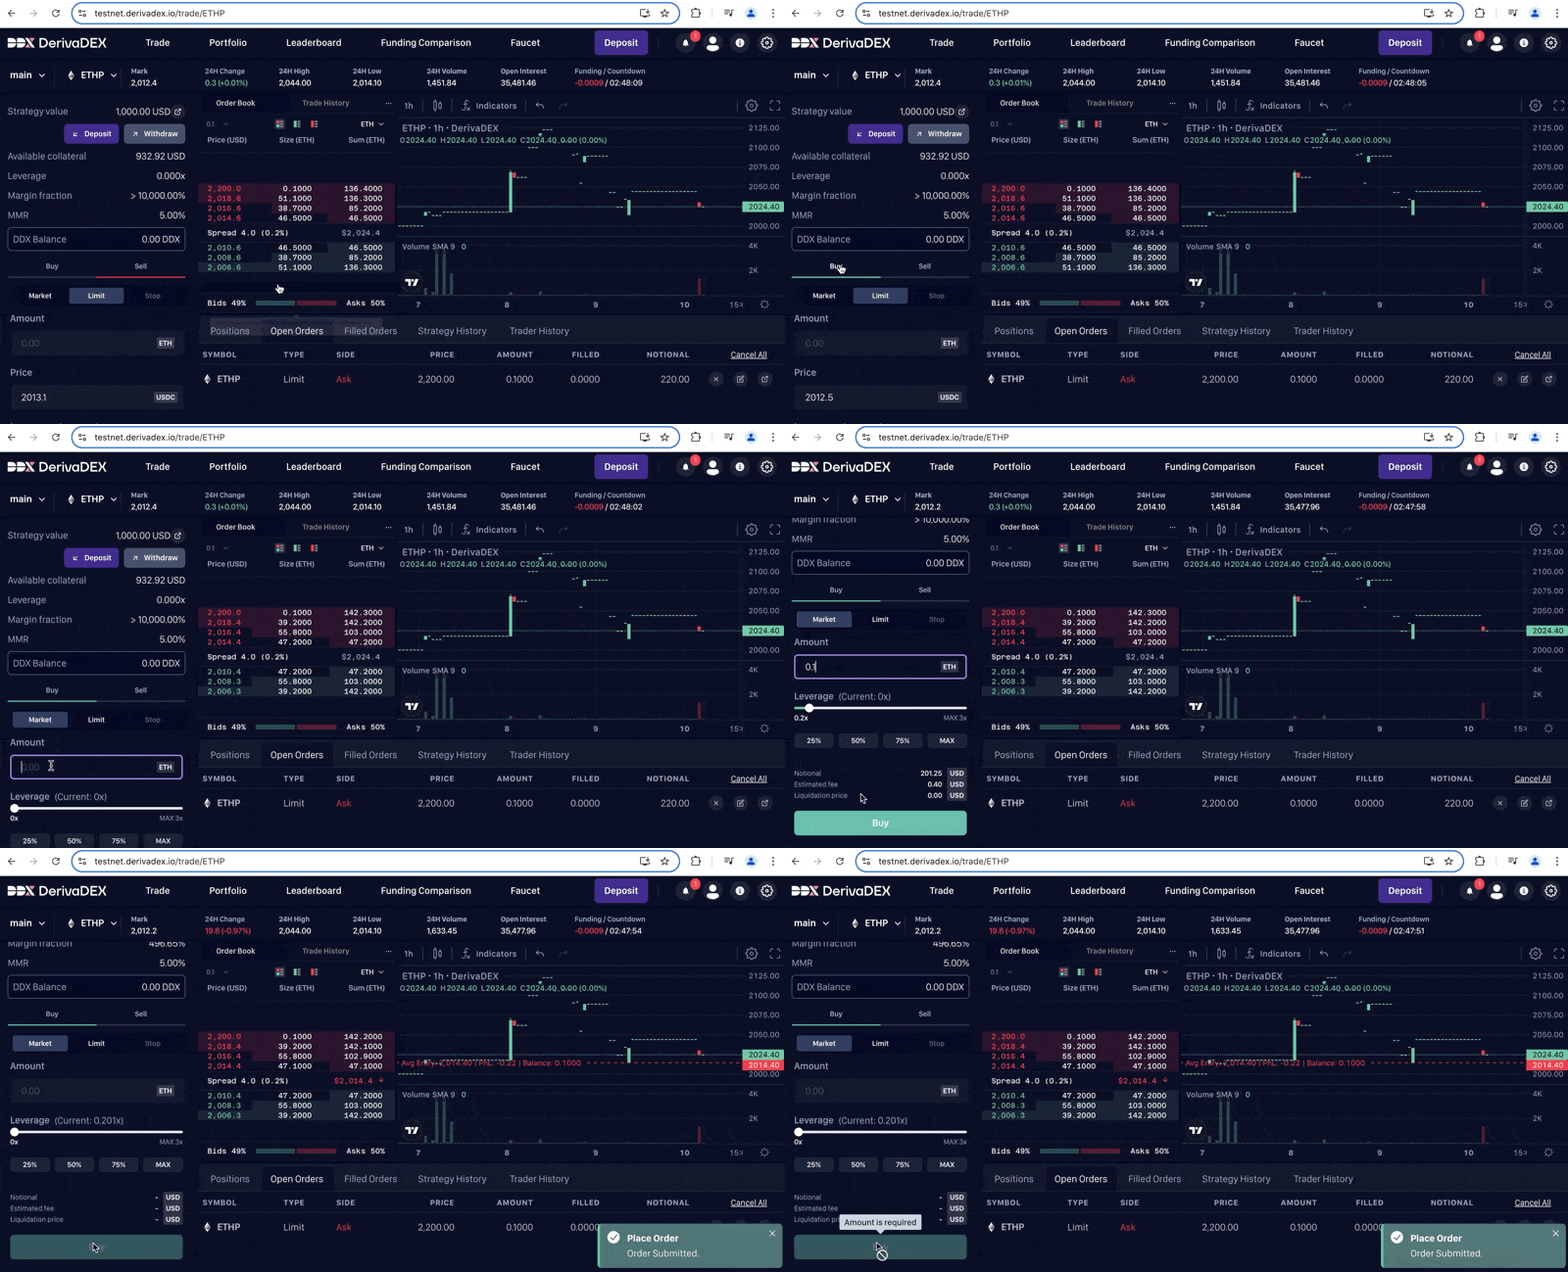
We'll place a limit sell order above the current market price. This ensures our order won't fill immediately, so we can see it appear in the order book.
In the order entry panel on the left:
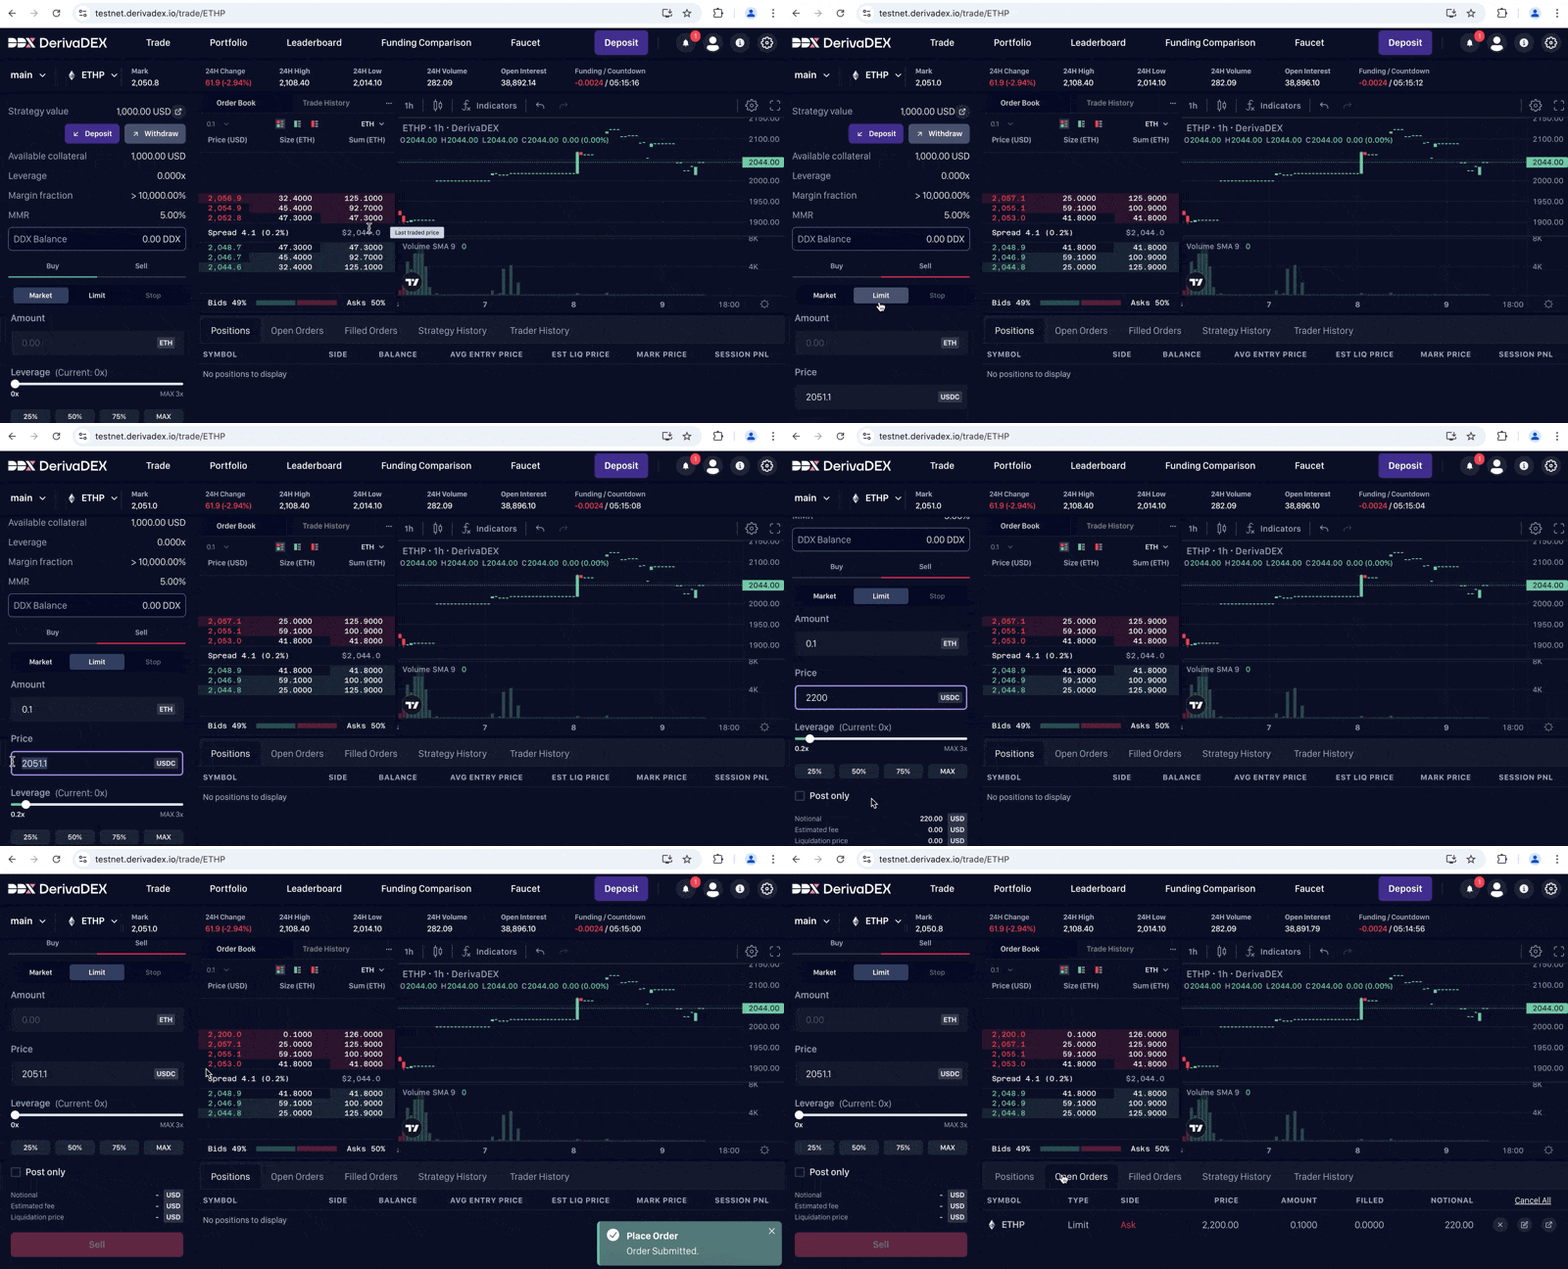
1. Click **"Sell"**
2. Click **"Limit"**
3. **Amount**: Enter `0.1`
4. **Price**: Enter a price about $100-200 above the current mark price shown at the top (e.g., if the mark price is ~$2,050, you can enter \$2,200)
5. Click **"Sell"** to submit
You'll see: **"Place order submitted"**
Your order now appears in:
* The order book (at the top of the sell orders)
* The **"Open Orders"** tab at the bottom
***
## Step 8: Place a Limit Sell Order
We'll place a limit sell order above the current market price. This ensures our order won't fill immediately, so we can see it appear in the order book.
In the order entry panel on the left:
1. Click **"Sell"**
2. Click **"Limit"**
3. **Amount**: Enter `0.1`
4. **Price**: Enter a price about $100-200 above the current mark price shown at the top (e.g., if the mark price is ~$2,050, you can enter \$2,200)
5. Click **"Sell"** to submit
You'll see: **"Place order submitted"**
Your order now appears in:
* The order book (at the top of the sell orders)
* The **"Open Orders"** tab at the bottom
 ***
## Step 9: Execute a Market Buy Order
Now we'll place a market buy order that fills immediately against the best available prices.
In the order entry panel:
1. Click **"Buy"**
2. Click **"Market"**
3. **Amount**: Enter `0.1`
4. Click **"Buy"** to execute
You'll see: **"Place order submitted"**
Since this is a market order, it executes immediately.
***
## Step 9: Execute a Market Buy Order
Now we'll place a market buy order that fills immediately against the best available prices.
In the order entry panel:
1. Click **"Buy"**
2. Click **"Market"**
3. **Amount**: Enter `0.1`
4. Click **"Buy"** to execute
You'll see: **"Place order submitted"**
Since this is a market order, it executes immediately.
 ***
## Step 10: Monitor Your Position
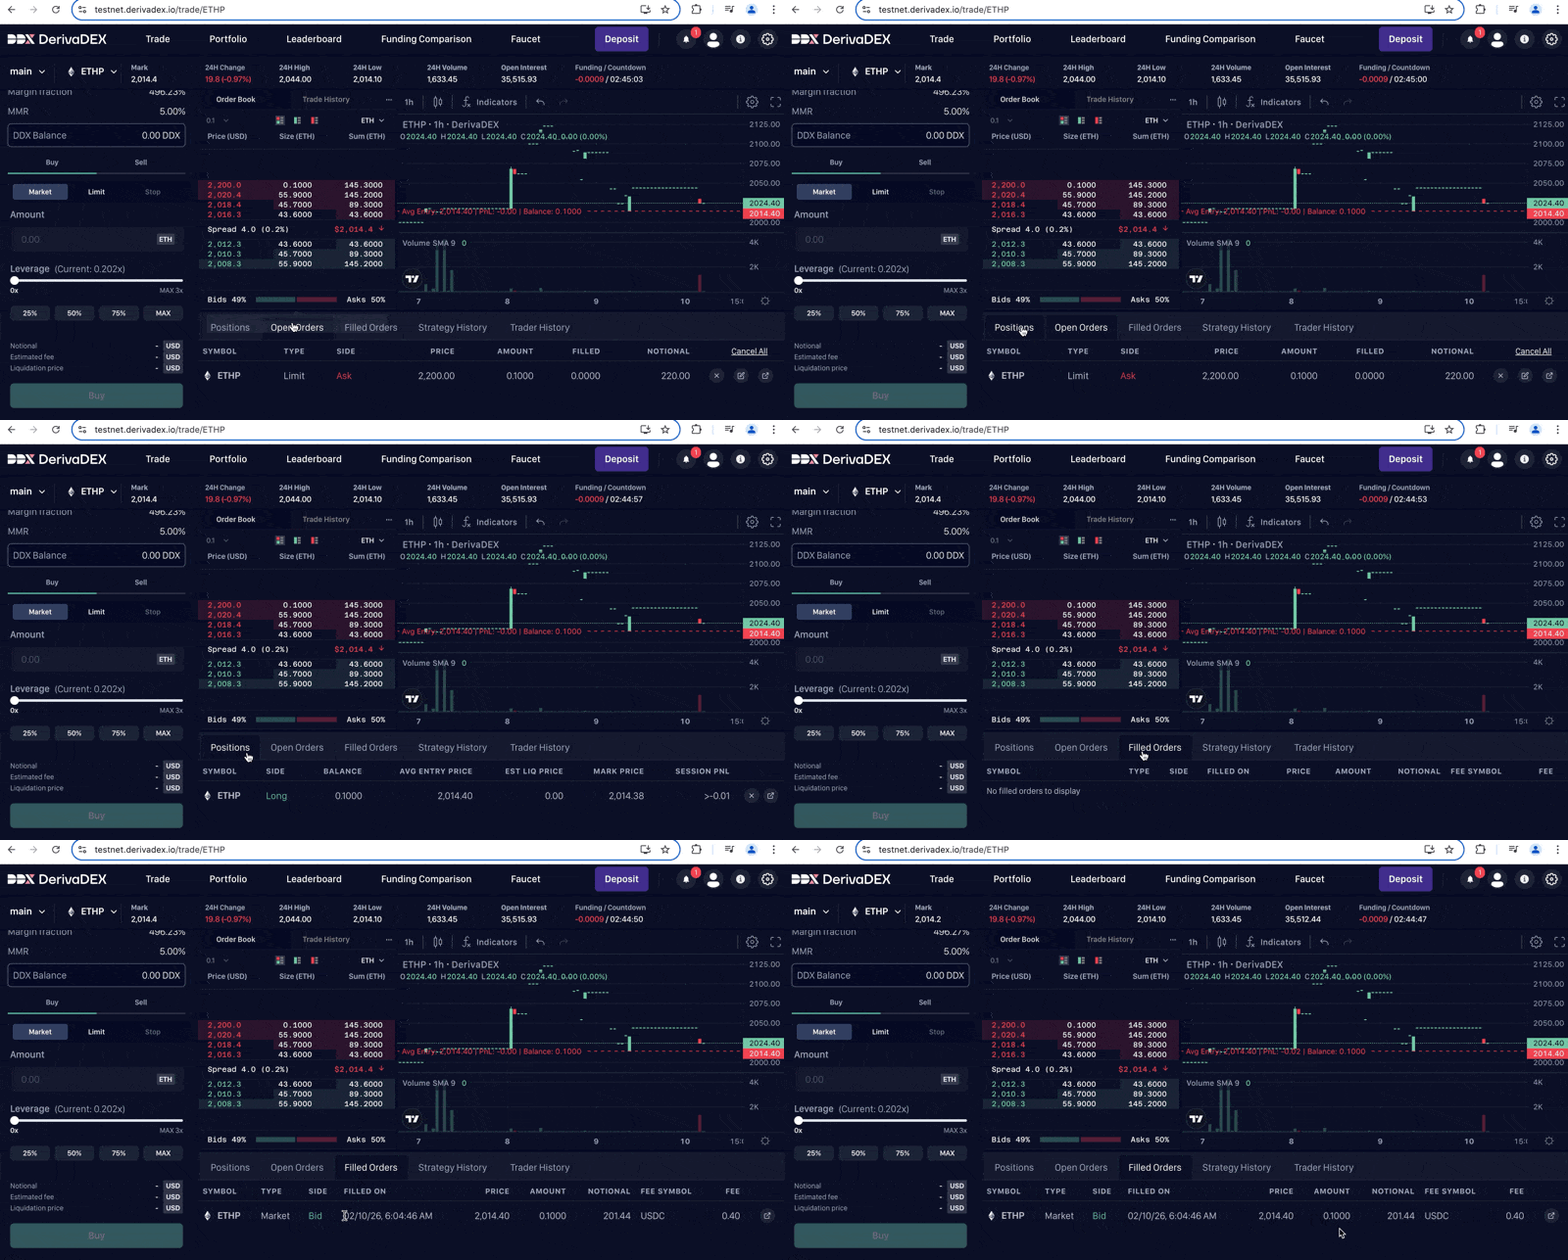
Let's check the results of our trades. Click the **"Positions"** tab at the bottom of the screen.
You'll see your new position:
* **Symbol**: ETHP
* **Side**: Long
* **Balance**: 0.1
* **Average Entry Price**: The average price at which your market order filled
* **Session PnL**: Your unrealized profit/loss (likely slightly negative due to fees)
Click the **"Filled Orders"** tab to see your trade history. This shows each fill that made up your market order.
***
## Step 10: Monitor Your Position
Let's check the results of our trades. Click the **"Positions"** tab at the bottom of the screen.
You'll see your new position:
* **Symbol**: ETHP
* **Side**: Long
* **Balance**: 0.1
* **Average Entry Price**: The average price at which your market order filled
* **Session PnL**: Your unrealized profit/loss (likely slightly negative due to fees)
Click the **"Filled Orders"** tab to see your trade history. This shows each fill that made up your market order.
 ***
## Step 11: Check Your Results
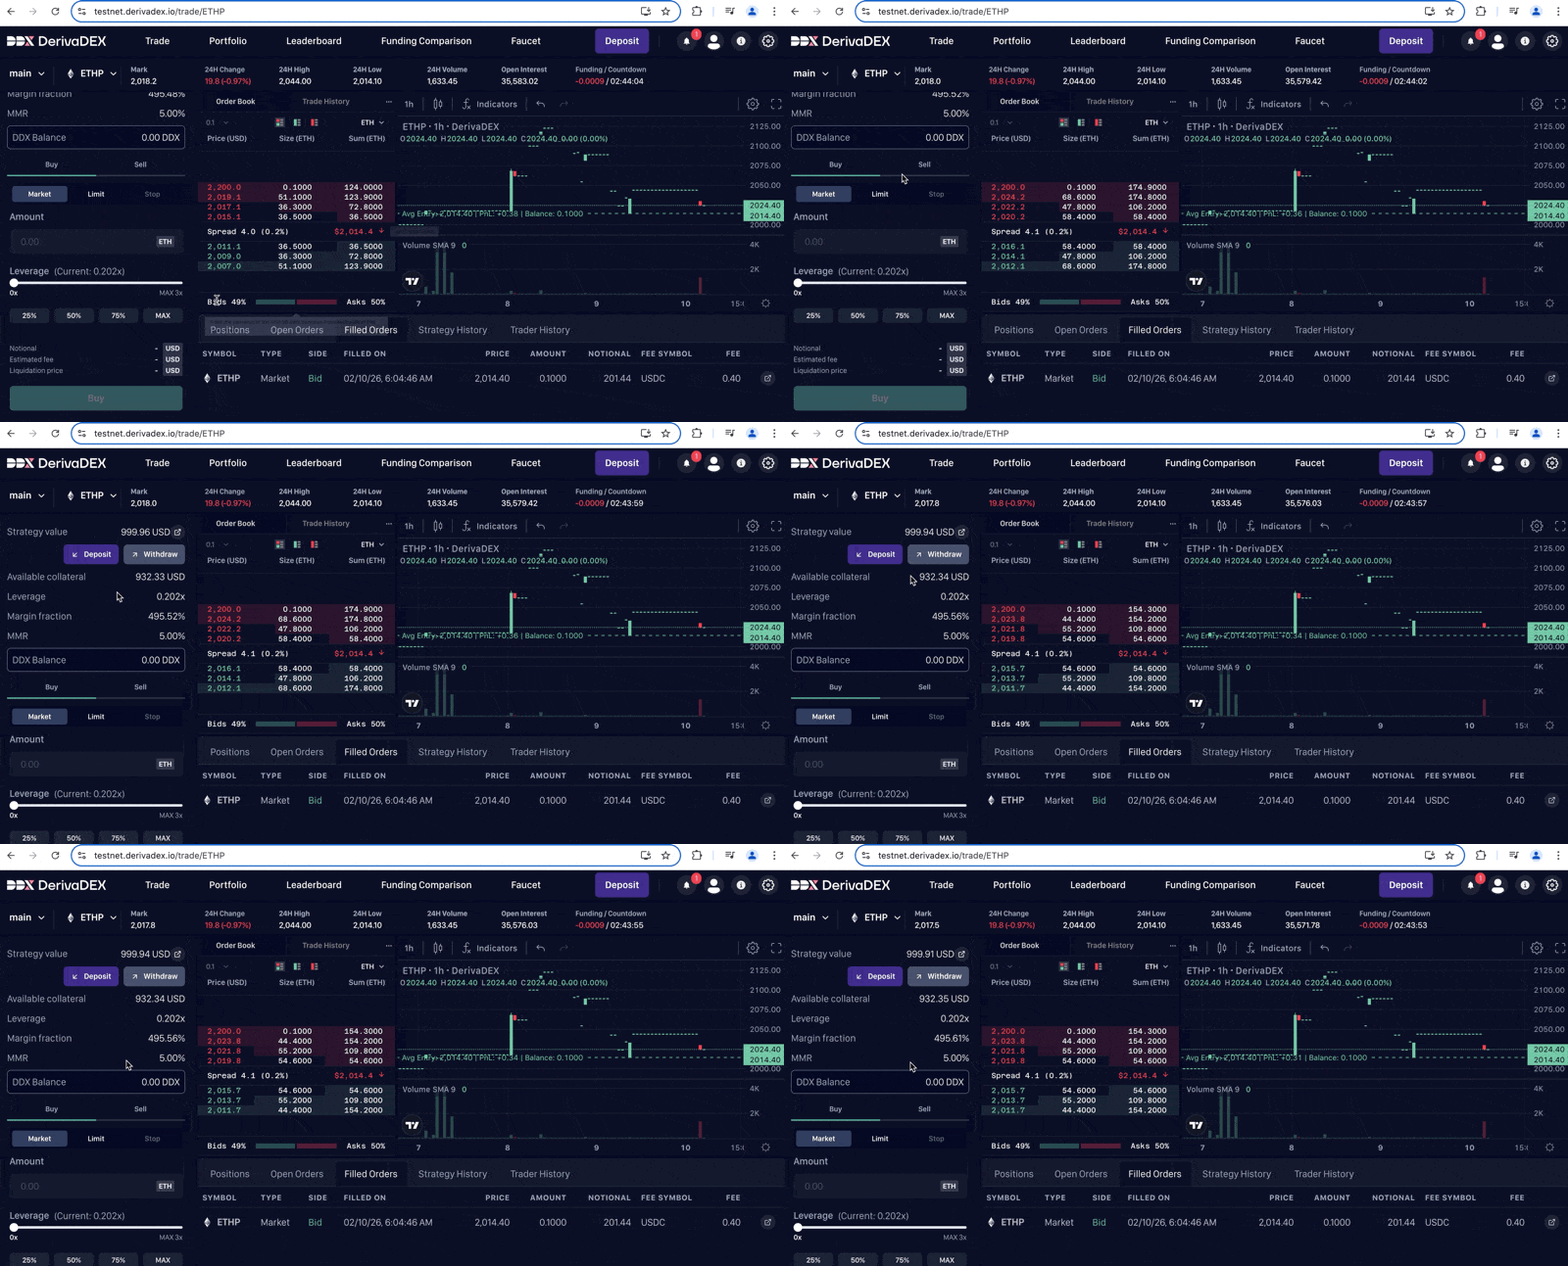
Take a moment to observe what happened:
1. Look at **Positions** - you now hold 0.1 ETHP long from your market buy
2. Look at **Open Orders** — your limit sell is still waiting in the book
3. Look at your **Strategy Value** — it reflects your current unrealized PnL
Notice that your available collateral is now less than 1,000 USD. Some is allocated to your open position and pending order.
***
## Step 11: Check Your Results
Take a moment to observe what happened:
1. Look at **Positions** - you now hold 0.1 ETHP long from your market buy
2. Look at **Open Orders** — your limit sell is still waiting in the book
3. Look at your **Strategy Value** — it reflects your current unrealized PnL
Notice that your available collateral is now less than 1,000 USD. Some is allocated to your open position and pending order.
 ***
## Lesson complete
You have now:
* connected MetaMask to the Sepolia testnet
* funded the wallet with testnet ETH and USDC
* deposited collateral to the default strategy
* enabled one-click trading
* placed a resting limit order
* executed a market order
* verified the resulting position and open-order state
If you repeat this flow on mainnet later, start from the live exchange route, complete the current eligibility or KYC requirements there, and re-check funding and risk before depositing real funds.
***
## Lesson complete
You have now:
* connected MetaMask to the Sepolia testnet
* funded the wallet with testnet ETH and USDC
* deposited collateral to the default strategy
* enabled one-click trading
* placed a resting limit order
* executed a market order
* verified the resulting position and open-order state
If you repeat this flow on mainnet later, start from the live exchange route, complete the current eligibility or KYC requirements there, and re-check funding and risk before depositing real funds.